
Video to Prompt: Analyze a Reference and Adapt Each Shot
Author
Date published

To turn a video into a useful prompt, describe what the reference actually shows, separate the shots, and then adapt the description to your own subject and generation tool. Prompt reverse-engineering provides a draft of that visual brief. It does not recover the original creator’s hidden prompt, camera settings or production process. This guide takes you from selecting a local reference to checking the analysis, rewriting a shot and evaluating a generated result. If you are still choosing which workflow you need, start with the Video to Prompt feature overview linked below.
Key takeaways
- Start with one visual question and a focused reference you can compare with the analysis.
- Review the whole-video prompt, complete shot sequence and individual shot prompts as different views.
- Replace the subject deliberately, then adapt the checked brief to the target tool’s input mode.
- Keep revisions and inspect generated results; a description does not guarantee exact reconstruction.
Decide what you want to learn from the reference
Choose one visual problem before you analyze the video. You might want a camera move that reveals a product, a lighting treatment that separates a white object from its background, or a sequence that alternates detail shots with an establishing view. These are different briefs. A single request to “copy the style” leaves you without a clear way to judge the description or the new result.
Watch the source and write one sentence about the element worth studying. For example: “Use a slow approach to a stationary product, keeping its outline readable against a warm background.” Then note which details belong to the original subject and which belong to the shot’s visual treatment.
| Your question | Useful output to inspect | What to record |
|---|---|---|
| How does this individual shot work? | Individual shot prompt | Framing, action, light and camera movement |
| How do the shots connect? | Complete shot sequence | Order, changes of viewpoint and recurring details |
| What is the visual direction of the whole clip? | Whole-video prompt | Setting, subject and broad visual treatment |
The Video to Prompt overview describes the analysis feature. If your question concerns persuasion, spoken messaging or narrative structure, use script deconstruction as a separate task. A camera description does not explain why a script’s argument works.
Prepare a focused local reference and a comparison note
Use a video that clearly shows the element you want to analyze. You will need the desktop app, access to prompt reverse-engineering and a place to keep the source description and later revisions. Availability and usage costs should be checked in the app before submitting a larger task.
In the client reviewed for this guide on October 10, 2026, local selection rejects files larger than 100 MB or longer than five minutes. Its file picker includes MP4, MOV, AVI, MKV, WMV, FLV and WebM extensions. These are selection options, not a guarantee that every codec in those containers will process successfully. Keep enough image detail to inspect the feature you are studying when preparing a shorter or smaller reference.
For a long source with unrelated scenes, prepare a focused excerpt. Retain enough of the beginning and ending to understand the camera action. A clip that starts halfway through a move can make its direction ambiguous. The video splitting guide explains how to prepare reusable footage from an existing recording.
Write down what is visible before the analysis
- Identify the main subject and any important secondary subject.
- Record the surface, background and position of the subject.
- Note visible motion: what moves, in which direction, and what stays still.
- Mark changes between shots and keep a reference to their source positions.
- List uncertain details, such as a reflective material or a camera move you cannot confidently identify.
These notes give you something independent to compare against the output. Avoid supplying certainty that the video cannot support. “Soft light from frame left” is a useful observation; a specific lamp model is a different claim that would require production information.
Run prompt reverse-engineering and separate its three views
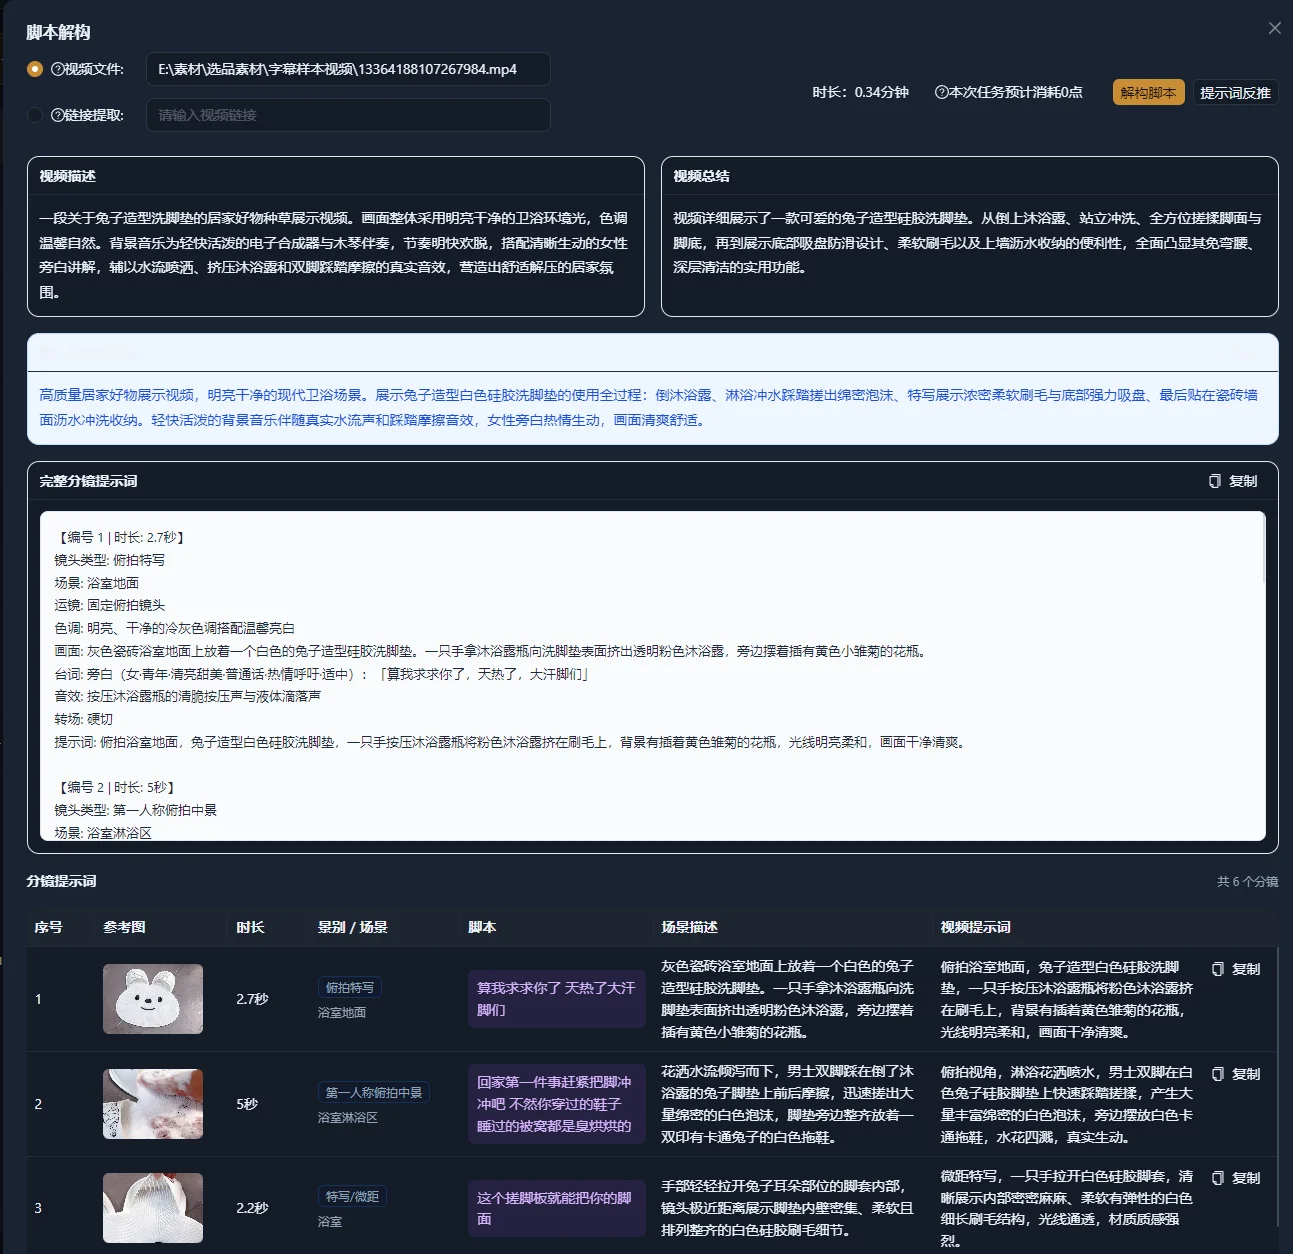
The verified client path starts in Script Management, inside the video deconstruction window. Choose the prompt reverse-engineering task, which is separate from script deconstruction even though the modes share the window. This tutorial describes the purpose of each control; the exact label language depends on your client interface.
- Open Script Management and the video deconstruction window.
- Select the local reference file and confirm that it is the source you prepared.
- Choose prompt reverse-engineering and submit the task.
- Open the result and inspect the whole-video prompt, complete shot sequence and individual shot prompts.
- Copy the relevant output and retain an unchanged copy beside your comparison note.
The same window also provides link extraction. In that mode, the client tries to download the referenced video before analysis. If extraction fails, check that you supplied a video link supported by the extraction workflow or prepare a local file. Do not assume every platform page, private video or expired link is a usable input. The local-file checks described above should not be read as a promise about every extracted link.
Check access for the selected task and the usage information shown in the interface. Access to script deconstruction does not by itself establish access to prompt reverse-engineering. Also keep source permission separate from app access: the ability to download or analyze material is not evidence that you can reuse its footage in a new production.
Keep overview text separate from shot instructions. The whole-video description helps orient you. The shot sequence helps recover structure. An individual prompt gives you a more manageable unit to revise. Putting every shot’s action into one generation request can create conflicting instructions about where the subject and camera should move.
Verify that the result describes the selected file and that the individual shots follow its visible order. When an action appears in the wrong shot, correct the association before adapting the text. A fluent paragraph can still describe the wrong moment.
Audit the prompt against the footage, not its confidence
Check the analysis as a proposed description of the footage. Correct missing or mistaken details before deciding which ones to reuse. Separate visible facts from interpretation so that an attractive phrase does not become an unintended requirement.
| Element | Check against the reference | Revision when uncertain |
|---|---|---|
| Subject | Object, person, color and visible parts | Use observable details rather than an inferred identity |
| Action | What moves and in which order | Describe the physical action directly |
| Setting | Surface, background and spatial relationship | Remove incidental details you cannot confirm |
| Light | Direction, softness and visible color | Avoid guessing exact fixtures or exposure settings |
| Camera | Framing, direction and change in viewpoint | Describe the observed move if its technical name is unclear |
| Sequence | Shot order and continuity | Split unrelated actions into separate shot briefs |
Google’s Video generation prompt guide separates subject, action, context, camera angles and camera movement. Its distinction between a dolly and a zoom is useful here: one moves the camera through space, while the other changes lens magnification. Use that vocabulary only when it matches the reference.
Do not treat every inferred adjective as essential. If “luxury” is doing all the work, replace it with a visible description such as a simple background, controlled reflections and a slow reveal. You can then check whether those choices appear in the output.
Worked example: adapt a bottle reveal to a ceramic cup
This is an illustrative editing exercise, not an observed app output. Imagine a reference with a bottle standing on a wooden table, warm side lighting and a slow approach from the camera. The brief is to make a new shot of a white ceramic cup while keeping the restrained reveal.
Keep a neutral reference description
A bottle stands on a wooden table. Warm light from the left creates a bright edge on the bottle. The background is soft and out of focus. The camera slowly moves closer while the bottle remains stationary.
This description states the subject, lighting relationship and motion separately. It avoids assuming a lens, lamp or exact duration. Before adapting it, confirm that the visible change is a camera approach rather than the bottle moving toward the camera.
Replace the subject and remove conflicting details
| Reference detail | Decision for the new brief | Reason |
|---|---|---|
| Bottle shape and cap | Replace with a ceramic cup and right-facing handle | The product geometry changes |
| Warm side light | Keep, with a readable white outline | This is the treatment being studied |
| Wooden surface | Use a light wood surface | The new brief needs a simpler contrast |
| Slow camera approach | Keep one controlled movement | The reveal should remain the main event |
Write a new shot brief
A white ceramic cup sits on a light wooden table, with its handle facing right. Soft warm light from the left separates the cup’s edge from the simple background. The cup stays still as the camera slowly approaches, ending on a closer view of the rim and handle.
Judge this prompt against the new brief, rather than the original bottle. The cup must retain its shape and handle; the light should preserve its outline; and the camera should perform the intended approach. If a later result changes the handle position, that is a subject-consistency issue. Adding more lighting language would not address the same problem.
Adapt the checked description to the target video model
A reverse-engineered description is a portable brief, but its final prompt should match the target tool’s input mode. A text-to-video request may need a fuller description of the scene. An image-to-video request already includes visual information in its starting image, so you may need to emphasize what should move.
Google’s video generation best practices explains that an image supplies the scene’s appearance and recommends concentrating an image-to-video prompt on motion. For the cup example, first check that the supplied image already has the correct cup, handle orientation and light; then describe the movement you want.
Illustrative image-to-video motion prompt: The cup remains stationary while the camera slowly moves closer, ending on a closer view of the rim and handle.
OpenAI’s Sora 2 Prompting Guide recommends a single clear camera movement and subject action for each shot, with actions described in timed steps. That is guidance for Sora, not a universal syntax rule for every video generator. Consult your target model’s documentation before turning a checked brief into its input.
Keep the full checked brief even when the final tool prompt is shorter. The brief defines what you are trying to achieve. The tool prompt is the particular input you are testing.
Review the result with a controlled revision loop
Change the requirement that failed, then compare the next output against the same brief. This makes revision easier to understand than rewriting the entire prompt after every attempt.
- Review subject identity and geometry before camera style.
- Check the action and camera move from beginning to end.
- Identify one discrepancy in concrete terms, such as “the cup rotates during the approach.”
- Revise the relevant instruction or starting image.
- Retain the earlier prompt and write a short reason for the change.
A simple revision record might contain the source filename, selected shot, checked description, target model and input mode, prompt version, and the issue found in its output. Record settings shown by the target tool when they affect your comparison. The record can be a document; this guide does not assume the app has a dedicated prompt experiment tracker.
If the issue is in the starting image, revise that image rather than asking the motion prompt to repair every visual detail. If your intended result needs several distinct shots, prepare separate briefs and assemble the outputs in the editing workspace.
Troubleshoot descriptions and generation mismatches
Identify whether the problem began in the analysis, the rewrite or the downstream generation. Repeating the analysis will not fix a brief that intentionally asks for incompatible actions.
| Symptom | Possible cause | Next check or fix |
|---|---|---|
| Local file selection is rejected | The reference exceeds the current file-size or duration check | Prepare a focused excerpt within the displayed limits |
| Link extraction fails | The extractor cannot obtain a usable video from the link | Check the link and prepare a supported local file when appropriate |
| The description names the wrong object | The visual analysis inferred an identity incorrectly | Check the source and rewrite the observable subject details |
| The prompt combines several camera moves | Sequence text was treated as one shot | Separate the shots and choose the movement required for each |
| The new product retains old subject details | The adaptation left contradictory nouns or geometry | Review every subject reference, including secondary clauses |
| The image-to-video output starts with the wrong composition | The starting image conflicts with the brief | Inspect and replace the starting image before changing motion language |
| The camera and subject both move unexpectedly | The prompt leaves their relationship unclear | Specify which element moves and which remains stationary |
| The result does not exactly match the reference | A description is being treated as a reconstruction guarantee | Evaluate the defined visual requirements and revise the failed element |
When you cannot determine a cause, reduce the request to one subject and one movement. Inspect that result before restoring additional actions or scene details. Avoid inventing a precise setting from the reference just to make the prompt sound technical.
Finish with a reusable visual brief
Your deliverable is ready for further production when someone can understand the intended shot without opening the reference. Check both the description and the new material against these acceptance criteria.
- The source and relevant shot positions are recorded.
- The description matches visible subject, action, framing and movement.
- Uncertain observations are corrected or clearly left unspecified.
- The new subject has replaced all conflicting reference details.
- The target prompt fits the tool’s actual input mode.
- The output has been reviewed for subject consistency, motion and shot continuity.
Keep the approved brief and revisions with the associated work in Script Management or your production records. If the next task is to build a video from footage you already have, continue with the asset-based film creation guide. The visual brief can guide shot selection without requiring a generated replacement for every shot.
Frequently asked questions
Does Video to Prompt recover the prompt used to make the source?
It produces descriptions to inspect and adapt. The source video does not reveal the original hidden prompt, model settings or production history. Use the output as a proposed visual brief, then compare it with the footage.
Should I use the whole-video prompt for every generation?
Use it to understand the overall direction. For a specific shot, select and revise that shot’s description. A sequence containing different subjects, moves or locations may need separate generation inputs and later editing.
What if the reference is live action rather than AI generated?
You can still study its visible composition, lighting, action and movement. Describe what you can observe. Do not claim to recover the actual lens, lighting equipment or camera settings unless the production supplies that information.
Can the prompt replace footage of an exact product?
A prompt gives direction to a generation tool, but the resulting material still needs inspection for shape, labels and other important details. When exact product appearance matters, choose an appropriate input and review the output carefully, or use verified footage in the edit.